Ditch filled with peat
The problem was the swampy nature of the site and the relatively small ditch on its border. In the spring, and also after prolonged rains, the entire area turned into a swamp squelching underfoot. At first they tried to clean the ditch, but within 2-3 months it began to swim again. Our site is a former swamp with a decent layer of peat, so this slurry did not want to hold any decent shape.
In 2013 (the year before), we laid a finished drainage pipe with a diameter of 100 mm on the other side of the site to a depth of 40 cm. I liked the result - part of the area was noticeably strengthened, the nasty slurping noise disappeared. The upper end of the pipe was lowered into the swamp behind the site and thereby drained it. These improvements pushed us to further land reclamation.
The car tires were assembled relatively easily; if you had a car, this did not become a problem. Things progressed especially quickly during the period of mass replacement of winter tires with summer ones - we were met at tire shops by satisfied workers, of course, because we saved them from the problem of disposal. The required amount of this material was somewhat intimidating, so our 30 meters of ditch required 150 tires.

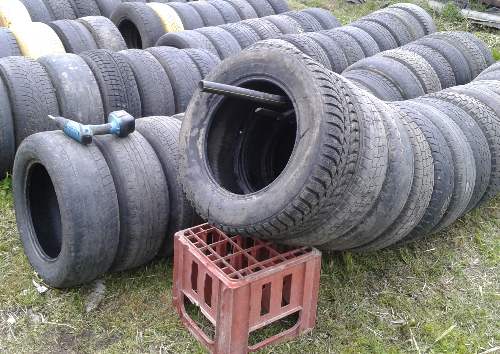
The photo shows most of the assembled tires.
The tires were sorted and rolled by size. Large sizes (R16 - R17) went to the lower (outlet) side of the ditch, R14 - R15 to the beginning
These tires were connected to each other with self-tapping screws with wide heads (bugs) 40 mm long. It was better to screw in self-tapping screws with sharp ends without a drill.
A slightly modified carpenter's clamp was used to compress the sides of the tires. The modification consisted of lengthening the handle. First, the edges of the tire were tightened with this clamp, then a screw was screwed into the connected sides with a screwdriver.

A modernized carpenter's clamp for compressing the edges of tires.


 Since the screw easily tore off its own thread, a piece of thick polyethylene was placed on the back side (photo on the left). Fastening was usually done in three places
When twisting, the tires were placed one on top of the other. The result was a pillar (photo on the right). When twisting the seventh and eighth tires, it was necessary to substitute a box to get to the top of this “pyramid”.
In some cases, the tire was screwed on while the pipe was lying down
I tried not to twist pieces that were too long, since moving them was no longer so easy. A convenient option was pipes made from 7-8 tires.
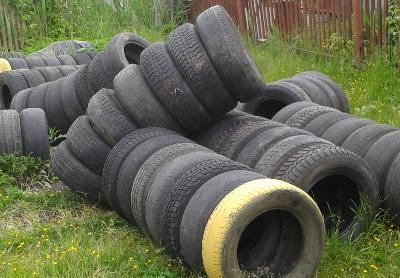
Tire pipes

The tire pipes were prepared in advance and lay on the site for a long time, arousing the curiosity of the neighbors. We were waiting for a dry season, when the groundwater would go below the excavation level.

Fastening pipes with tin and self-tapping screws
The pipes were joined using tin strips with punched holes and self-tapping screws. The next section was laid pressed against the previous one and two strips of galvanized sheet were screwed on top
Despite connecting the tires with self-tapping screws, the connection was not tight. Many tires had cuts; some products did not press well against each other due to design differences. Somehow, due to the presence of these cracks, fears arose that the pipe would float over time, and it was decided to surround it with a layer of spabond. Immediately before laying, the material was spread on the bottom of the trench and, after joining the pipe pieces, it was wrapped on top.


Everything was filled with sand to a level 10-15 centimeters above the site. Taking into account the fact that the sand will compact over time and fall under the tires.
You can build a swing, a flower bed, slides, figures of fairy-tale characters from tires, garden furniture and much more. The article discusses the main ways of using car tires, for which you can use a tire well, and how to decorate materials in a country style.
Homeowners often face the problem of water shortage. You should not throw away old tires, you can create a well from tires using available funds and others interesting ideas for a garden or plot. Such wells are built different models and forms, using scrap materials. The device not only creates beautiful decor on the site, but also become a useful source of water for household needs or a septic tank.
A tire well is the perfect addition to your garden and is so easy to make. Follow the step-by-step instructions here and you'll have your own wishy-washy planter in just a few hours.
Now recycled tires are likely to be used in everything from playground and road surfaces to water control installations. All of these applications use a material that is strong, durable and readily available. They also require quite a bit of processing. The strength and durability of tires make them attractive as a building material and typically require relatively minimal processing but maximum knowledge of the construction process.
As with any decorative structure, it is necessary to determine the location of the well on the site. The choice depends on the purpose of creating the well and the size of the available tires. If the building will perform only a decorative function, then the optimal place would be near a flower bed or in a free area where the soil is soft. If you plan to use a tire well to collect rainwater to water plants or a safety device to extinguish a fire, then it is better to locate the building next to the house, but not less than 5 meters.
When choosing a location, it is important to take into account existing sewer lines and pipelines laid in the ground, possible sources of pollution and soil density, as they will require excavation.
The well construction process is divided into three steps:
- digging/laying the bottom
- creation of a mine
- construction of a canopy.
At the excavation stage, it is necessary to maintain digging standards, as for a drinking well, only the depth will be much less. Digging is allowed at a distance of at least 50 meters (sanitary zone) from sources of pollution. Dig a hole to the depth of the height of the tires you want to install, and a width of 20 centimeters greater than the outer diameter of the tire. Usually 2-3 tires are installed/buried in the ground, so the depth of the source, or more precisely the distance of water storage, includes the walls above the ground. Therefore, it is important to form a sealed well.
Materials and tools

Required materials and tools:
- 3-5 old tires for a well depth of 1 meter
- Roofing materials
- Wood (for roof or canopy supports)
- Landscape glue
- Spray paint
- screws
- Screwed hook
- Hacksaw, knife
- shovel
You can build a well from the above tools in literally a day. The internal size of each tire should be increased and holes made for support posts. To do this, cut out a ring 5-8 centimeters from the tread using a knife or hacksaw. It is recommended to lubricate the tool blade with oil or soap to make it glide easier. It is also recommended to trim the inside of the tire to increase water storage capacity.
Construction of a shaft and canopy

Place the first tire on the ground, measure and fix the locations for the support pegs. A small hole is dug in the marked place to install the posts. For additional fixation of tires, the base for the pegs can be reinforced with bricks or concreted.
After making sure that the first tire lies tightly in the hole, lay 2-3 from above to ground level so that the support pegs fix the straightness of the structure. For the strength of the building, it is recommended to glue the tires together with moisture-resistant rubber glue. Then the remaining distance of the shaft on the sides of the tires is covered with soil, stones or expanded clay.
Usually 2-3 tires are laid on top above ground level. The quantity depends on the design of the well and the size of the canopy. It is not recommended to install more than three tires above the ground.
Level the ground and remove any grass or rocks around the tires. Create a support as a guide using bricks/stones around the well. This will strengthen the structure, because the building will store water.
The last step is to build the roof/canopy. In order for the well to have an attractive appearance, first of all it is necessary to trim the driven posts to the height. It is better to make a canopy from a special roofing material or wooden boards, since the rubber material of tires tends to sag and become flexible at high temperatures.
Stages of roof construction:
- installation of canopy supports. The structure is created like the roof of a drinking well. Vertical posts support the roof frame;
- flooring of roofing material or boards, slate, metal tiles, roofing felt.
The canopy model can be of any shape: single slope or double slope. For the roof, it is necessary to consider the fastening of the bucket and the mechanism for lifting it. You can hang a bucket on the gate in which to plant flowers.
If you decide to abandon the look of a classic well, then a crane well will become an interesting decor. To do this, you will need to attach the bucket to a pole and secure it to the walls. To prevent the well from clogging, make or find a simple removable lid.
Decorating and painting

Oil-based dyes are not used for painting tires. It is strongly not recommended to use oil paints for hot regions if you do not want the decorative well to be lost after six months.
For painting tires best choice there will be enamel, bitumen and acrylic paint. The best option is rubber paint, which stands out for its ability to stretch and contract, which allows you to balance between sudden temperature changes. In this case, rubber paint is coated onto the same flexible material, which will provide a reliable coating.
Before painting the tires, make sure that there are no greasy stains left on the surface of the rubber, otherwise the paint will not adhere well and will fall off over time. Painting instructions:
Stages of painting a decorative well
- Wash the well with cleaning solutions. Dry the washed surface in the sun;
- Degrease rubber with acetone, gasoline or alcohol;
- Applying a coat of paint. To paint tires, you can use an ordinary brush or paint in cans.
- To paint a roof/canopy, it is better to use varnishes and paints that match the materials; special attention should be paid to wooden elements
- Dry the building for several days
- Decorative patterns are applied with a thin brush.
A tire well can be painted in any style and create a unique design. To do this, it is formed with plaster or cement, laid with bricks or outlined with paints, and lined with stone or tiles. The well shaft is the main decorative element that can be worked on in the future. In the meantime, pause the work and admire the resulting building.
From tires you can create many different things to decorate a constructed well or to improve the area. The tire material is easy to process. In addition to the tire well, you can install a variety of flower beds, figurines, garbage containers, a small pond or fountain nearby.
Decorative well: 3 options, master class, photo
A decorative well is a traditional decoration for a garden, courtyard of a private house or dacha. Such wells are built different types, there are simply magnificent ones, decorated with mosaics and carvings, lined with tiles, stone, etc.

The owners usually show their abilities in decoration. But if the owners of the farmstead do not have any special artistic talents, there is little time for crafts for the garden, but you want a beautiful decorative well? Here are three options for very simple wells, which, moreover, can be made very quickly, and the investment in them is minimal. It may even be possible to make do with improvised materials.
Decorative well made of tires with a flower bed. Master Class
You will need:
- 3 used car tires.
- 2 small diameter logs or 2 pieces of timber.
- 4 pieces of thin timber to construct a roof support.
- Roof material.
- Fasteners: nails, screws, metal corners, etc.
- Dye.
- Container for planting flowers.
If all the materials are prepared, this simple but interesting decorative well can be built in a couple of hours.

We make slots in each of the 3 tires sharp knife or a hand saw - support posts will be inserted into them to support the roof.
We lay the tires one on top of the other so that the slots line up.
We insert beams/beams into the slots. We drive them into the ground so they don't wobble. We measure their length - they must be the same, otherwise the roof over the well will turn out crooked.
But you can do it another way - install support pillars outside the tires.

We paint the tires brown (brick color). After the background has dried, paint an additional design. For example, stripes imitating brickwork.
Decorative tire well - painting
Decorative wells from tires are made using almost the same technology. There are differences, but not dramatic ones. It is worth talking about how to paint tires - the main component of such wells.
We select paint. It can be oil paint that adheres well to rubber, although the coating will not last long. Most likely, a well that has stood in the sun/rain for a year will need to be renewed.
Enamel paint, bitumen, acrylic - all these are options for painting tire crafts. Rubber paint is very good in this regard. There is no rubber in it (as you might think, based on the name), but the coating has the ability to stretch and shrink a little depending on the temperature of the object, which, as it heats up and cools down, also changes its parameters, albeit minimally. The rubber of tires gets very hot under the sun, but the plastic coating does not crack.
There may be quite a lot of oil residue on a car tire, and it must be removed, otherwise the paint will not adhere well.
- Before painting, rinse the surface thoroughly with water and detergent. Dry.
- Degrease. It is most convenient to use acetone, gasoline, and alcohol for this.
- Background painting is done with a brush or spray gun. Aerosol paint in cans is the most convenient option.
- Let the craft dry for a while.
- We paint small details with a brush - paint that contrasts with the background.
Roof for a decorative tire well
It is better to make a roof for a decorative structure from roofing material, even if it is not new. Moreover, you will need a meager amount of it. With a roof that resembles a real one, the well will look more natural.
First, at the upper ends of the pillars we make a support for the roof - something like a lattice or a strong crossbar.
The simplest thing is to attach slate, other sheet material, boards, etc. to the support. You can make the roof flat or gable.
If you use plywood as a roof base, you can attach metal tiles to it, ceramic tiles, roofing felt, bitumen shingles, etc.
This interesting and simple option is also possible.

Container for a flower bed in a decorative well
The container for flowers does not have to be the entire depth of the decorative well. You can install some kind of stand inside the structure, and place a wide container on top (for example, an old basin).
Country vine - an economical option or durable


Abyssinian well and filter device for it

Features of well filters

How to clean a well yourself
Water is needed in a country house no less than in a residential building. But it is not always possible to connect to the city water supply network. There are two ways out - make a well or a well. It is easier to dig and equip a well. We’ll talk about how to cheaply dig a well in your dacha with your own hands from scrap materials in this article. Photos will help you understand the progress of the work in more detail.

What kind of peers are there in the country?
A dacha in the country can be made from several types of material:
- stone and lumber;
- using reinforced concrete rings;
- old car tires.
There are a lot of ways. Craftsmen come up with new ones using available materials. So, on the Internet you can find photos of structures made of plastic bottles, wood and even slate. But these options are unclear, and it’s not worth experimenting with.
What is taken into account when choosing materials
When choosing material for a peer, the following factors are taken into account:
- what volume is needed;
- what kind of soil is on the site;
- material and physical capabilities.
When the choice is made, we proceed to installation.
Choosing where to dig a hole
The well accumulates water not only from the lower layers, but also from shallow horizons. Water enters the soil from the surface, undergoing natural filtration. Before you dig, think about whether there are harmful industries nearby? Chemicals and waste products end up in the water and you should not drink it. You can first take a water sample and conduct research at the sanitary-epidemiological station. Price for analysis from 700 rub.
The second important point is that the structure must be positioned so that there is at least 20 m to the restroom and the place where animals are kept. Find a good place on the site you can use the old-fashioned method. Take the willow twigs and cross them to form a frame - a triangle. Walk around the area, the willow will show you where the best place is.
Installation of a leveler made of various materials
Making a well with your own hands is not difficult, but dangerous. The fact is that the walls of the pit crumble easily. While working, follow safety precautions:
- It is necessary to carry out excavations in a helmet; it is better to do the work together;
- when 1.5 m is dug, the bottom bather is tied with a rope for insurance;
- you need to take gas samples in the pit, but when installing it yourself, this is not done; Just monitor the bather’s well-being;
- The ropes used for lifting the soil are strong and must withstand the weight of bathers and buckets of wet soil.
Installation from reinforced concrete rings
It is difficult to make a well from reinforced concrete rings, as in the photo, without special equipment, but it is possible. The design will serve your children.

For work you will need reinforced concrete rings with a diameter of 0.8 to 1.5 m - 3–4 pcs. A shovel, ropes and several people.
The work is carried out in the following order:
- A hole is being dug. The depth is below soil freezing (from 2 m), the diameter is 15–20 cm larger than the selected rings;
- You can perform the work without special equipment. The first ring is placed on the bottom and dug into it. It is leveled as it goes deeper with ropes;
- Between each ring we place 4–5 H-shaped centering devices. They will not allow the rings to move when the ground moves;
- You need to dig a hole until wet slurry appears. Further, the pit deepens at least another 1 m (the most difficult part);
- We fill the bottom of the pit with 10–15 cm of crushed stone and tamp it down;
- Coat the seams between the rings with bitumen mastic;
- We install foam insulation around the rings on the outside;
- We fill and compact the cut with sand and crushed stone.
Stone installation
In terms of environmental friendliness, stone equalizer ranks first. Similar ones have been built in all villages since the 18th century. The work is painstaking and requires time and effort. To make a well you will need:
- red brick or natural stone;
- wood from moisture-resistant species (larch, aspen). You can use pine, but then the upper part will have to be repaired more often;
- hammer, saw, shovel;
- cement;
- sand and crushed stone, you can take ASG.
- A hole is dug with a diameter of 2–2.5 m and a depth of at least 2 m;
- The bottom is covered with sand and gravel to a depth of 10–15 cm and compacted;
- The masonry is made of brick or stone. Natural stone an even one is chosen so that the gaps are minimal;
- Having risen 1 m to the edge of the pit, we begin laying lumber. The material is combined into a bowl and additionally fixed with iron brackets;
- The woodwork is continued to the top, 60–80 cm above the surface.
The well will last more than 100 years. And distortions, due to the plasticity of wood, will be minimal. There is no need to make the head separately, the structure is complete. 
Installation from old tires
The simplest and most economical method is to make an equalizer using old car tires, as in the photo. To work you will need:
- tires with a diameter of R16 and larger (5–6 pcs.);
- sand with crushed stone;
- shovel;
- fittings
Installation is carried out in the following steps:
- A hole is dug with a radius 10 cm larger than the tires;
- The bottom is covered with sand and crushed stone to a depth of 10–15 cm;
- Tires are installed on top of each other;
- To give rigidity to the structure, we stick several reinforcements around the tires;
- The space between the tires and the pit is filled with crushed stone and compacted.
A do-it-yourself well at the dacha made from tires is ready.
Heading
 The upper structure that protects the well from debris is called the cap. The head can be assembled from wood, antique, as in the photo. The design of the head may be different, but its main function is protective.
The gate and roof are placed in the head. A chain or rope is put on the head, to which the bucket is tied. You can do it easier, throw a pump into the well. Water supply will be automated.
You can assemble the same at your dacha with your own hands, and the photos and videos in the article will help you figure out the installation.
Septic tank from tires: make a well from wheels and tires with your own hands; sewage is different from a cesspool
If things are not going very well with finances, craftsmen who came up with the idea of making a septic tank from tires with their own hands can help out. Often, the problem of many summer residents, as well as those who are just building their house, is the lack of sewerage on the site. A tire septic tank is not just a cesspool, but also an excellent analogue of a city sewerage system. The main good news is that you can do everything yourself, without resorting to large financial expenses and calling in specialists with large construction equipment.
- Tire septic tank: do it yourself
- DIY tire well
- Tire drainage
- How is a septic tank different from a cesspool?
- How to make a septic tank from tires with your own hands (video)
Tire septic tank: do it yourself
Due to the unhealthy environment in the world, there is a need to take care of waste disposal, which will outlive us. This also applies to old car tires. In recent years, city dwellers are increasingly buying houses away from civilization to enjoy nature. But life in a private house makes its own adjustments. Not every private house has a sewer system, but it makes life much easier.
You can build an effective septic tank from tires with your own hands, which, with the right approach to the matter, will be no worse than its more expensive analogues
But you can use old tires because:
- They can be found on the street, which saves you money.
- They are durable and will serve you for many years.
- Tires will not be crushed when the soil swells.
- Each tire has correctly calculated shapes and sizes, which will allow you to quickly make the necessary calculations for their quantity.
- To create a septic tank from tires, you do not have to use large equipment.
A septic tank is created to accumulate human waste and then pump it out.
To make a septic tank from tires, you need to know the volume of wastewater discharged. According to SNiP standards, the volume of a septic tank should be three times the volume of discharged wastewater per day.
DIY tire well
A do-it-yourself tire well is a fairly durable source of water for your summer cottage.
Creating a well from tires with your own hands is not too troublesome
To make a well from tires, you will need:
- Large diameter tires;
- Bitumen varnish;
- Shovel;
- Hammer;
- Nails;
- Crushed stone;
- Antiseptic glue.
The construction of a tire well is not much different from a septic tank. It is better to start building a well in the fall, since the water is as deep as possible, so your well will not dry out. After the hole is dug, you need to fill the bottom with crushed stone to strengthen the structure. It is also recommended to treat tires with antiseptic glue to increase strength. Next, perpendicular to each other, four bars are driven in along the edges of the tires. It is desirable that the well rises above the ground by approximately 70 centimeters. You can make a beautiful decorative cover, or you can install a simple cover.
Tire drainage
Tire sewerage involves a more complex device than, for example, a well. To equip it, you can install a whole system of pipes in the house. Also, the sewerage system consists of several blocks. Some use a system in which more than one septic tank pit is dug, but along with it a drainage well, at the bottom of which there is a polypropylene pipe dug to a depth of three meters. To avoid clogging of the drainage pipe, it is placed at a level of a meter from the bottom and the hole is covered with a mesh.
Sewerage from tires is the simplest and most affordable option arrangement of the system
If you make a sewer from car tires, you will need more of them, since they have a smaller diameter than truck wheels.
How is a septic tank different from a cesspool?
A cesspool, unlike a septic tank, is not a complex system of wastewater, it is a storage tank for them. A septic tank is often part of a sewer system. The cesspool makes it difficult to drain waste into the ground.
To understand how a septic tank differs from a cesspool, you need to accurately and clearly understand the principles of the design and operation of each of the storage tanks
A septic tank may have a number of advantages compared to a cesspool, namely:
- A septic tank may consist of two or three tanks;
- Using a septic tank, the need to frequently call sewer trucks is reduced;
- Useful for those who often visit the dacha;
- Less impact on the environment, unlike a cesspool.
How to make a septic tank from tires with your own hands (video)
For draining waste on a personal plot, all methods of arranging a sewer system are good. It is important to correctly calculate the volume of waste. Take a look at your capabilities and compare them with your desires.
Homemade tire well
To make it you will need 5-6 pieces of car tires (4-6 pieces), a bayonet shovel, and coarse gravel.
Design features
Practice has shown that a well located in the wrong place - on the edge of a plot or in a hole - is not able to fully satisfy economic needs. Therefore, it is better to dig a hole for a well in the middle of the area, this way you will reduce the total length of the hoses required to water the entire area. In addition, it is not recommended to build a well with your own hands near garden crops that are sensitive to excess moisture.
A decorative well can provide a small country cottage area an area of up to 10 acres with the required amount of water for all household needs.
Excavation and tire preparation
Follow the instructions below, and you will be able to build a decorative well with your own hands in the shortest possible time. Sequence of work:
1. Excavation work
First you need to dig a pit. When digging a pit, it is necessary to take into account the size of car tires. If you decide to build a well from tires of standard sizes, then the diameter of the pit should ideally be 1–1.3 meters. How deep should I dig a hole? For a well of 6 tires, a hole 2.5 m deep is sufficient.
2. Bottom sealing
3. Treating tires with non-toxic bitumen varnish
This procedure will increase the service life of tires by 200–250%. Rubber necessarily needs to be treated, since prolonged contact with the ground and water, especially hard water, leads to decomposition of the tires.
4. Treatment with waterproof glue with an antiseptic effect
Note that the decorative well does not need to be additionally treated with glue, however, if you want to extend the service life of the rubber to the maximum, you can treat them.
Tire installation
After careful processing of rubber by special means tires can be installed in the ground. Car tires are installed one at a time. Each installed tire is filled with crushed stone, broken bricks and other construction debris on its sides until it meets the other tire. The junction of the tires is covered with clay.
What kind of clay is needed, and how to prepare it? You will need ordinary red clay, in which the percentage of sand does not exceed 20%. A decorative well, coated with red clay yourself, has excellent performance and waterproofing qualities. The clay is diluted in water to a mushy state and applied in a thick layer at the joints of the tires around the entire circumference. Remember, the more clay you put in, the better the decorative well will retain water.
After installing the first three tires, the structure is covered on the sides with construction waste or broken bricks and earth. We continue to build the decorative well according to the strategy described above to the desired height.
Constructing a well above ground
Construction technology changes after comparison with the ground. Experts advise building a well with your own hands 70–90 cm above the ground. To prevent tires located on the surface from flying apart, they must be strengthened. You can do this in two ways:
1. Build a small box of bricks around the well
This technology ensures that your decorative well will stand confidently for many years. However, constructing a brick box requires some financial costs. In total, you will spend a little more than 3 thousand rubles (1.5 thousand rubles for the purchase of bricks, 700 rubles for cement and 800 rubles for sand and transportation of purchased materials).
2. Cover the tires with soil
This method does not require any financial costs, however, an improperly sprinkled decorative well may soon collapse. How to properly sprinkle a structure made from car tires with your own hands? It is better to sprinkle a decorative well sequentially, compacting each layer. For even greater reliability, you can cover the base of a DIY structure with heavy stones. Be sure to leave a clear path to the well, otherwise you will have difficulty pumping out water.
After falling asleep, your decorative well is ready for use.
Construction of an absorption septic tank
A decorative well can not only store, but also absorb water. The technology for constructing such a structure is practically no different from that described above. The only thing you should pay attention to is the organization of the sewer system.
In order not to disturb the waterproofing of the seam, you will have to make a small hole in the bottom tire for plastic pipe with a diameter of 2–4 cm. A stainless iron wire with a cross section of 0.3–0.5 mm is installed on top of the lower tire. The rest of the tires are laid on top of the mesh and carefully sealed.
Homemade tractor: an original solution
Sewage is one of the most important elements of a private home, which will help ensure comfortable living activities for residents. While apartment owners solve this problem by simply connecting to the central sewer network, then summer residents or owners of a private house have to build a sewage system from tires with their own hands. This is a simple and inexpensive option for arranging a private plot.
The structure looks like a tank consisting of two or three chambers, the purpose of which is to collect, settle and filter waste, which is ensured by special bacteria.
As a rule, all liquid that gets into the septic tank from tires is purified by 97-98%, according to SanPin standards. Home owners will not have to spend a lot of money to create such a structure, since worn-out tires are perfect materials.
In this article you can learn how to competently build a high-quality sewer system from tires.
Rules for building a structure
Locating the tank too far from the house is also a bad option. This will significantly increase the cash costs of building the structure.
As a rule, at least one manhole is required for the external part of the sewer. If the pipeline is longer than 25 meters, additional wells will have to be added.
If the water supply is too long, there is a high probability that blockages will often form inside. This should be taken into account even though a special pump will be installed that will remove wastewater from the sewer.
Tire sump options
The choice of structure depends on how much Wastewater will come out of a residential building. If few people live on the site, the simplest option will be enough for them.
Watch the video
For a family of more than four people, this option is not suitable, as it will quickly become unsuitable due to excessive load. Therefore, experts recommend considering the option with two wells.
Sump with filter system
This is an inexpensive sewer option. To build it, you will need to dig a hole for the foundation pit, arrange the bottom and put the tires down. It should be borne in mind that it is not advisable to build such a septic tank next to buildings or cellars.
It is better to give preference to wheels from large vehicles with a wide diameter, since they accommodate more waste and increase the working capabilities of the sewer.
The operating principle of such a septic tank is simple:
- waste flows through sewer pipe into the well through the drain;
- that part of the wastewater that does not dissolve does not fall into the ground and remains on the crushed stone layer;
- the purified liquid is absorbed into the ground through the drain.
The advantage of this design is that it does not require large construction costs, and also does not harm the environment, which makes it attractive in comparison with other options.
The main essence of the design is that water passes through the pipeline, bypassing the bottom contaminated with silt. However, the pipe quickly becomes clogged with the same silt and therefore it is short-lived.
Materials and tools necessary for the construction of sewerage from tires
If the owner of a private plot cannot afford to install an expensive sewer system, he can perfectly cope with this task using improvised materials, which, as a rule, are available to anyone home handyman. Old car tires or tires are perfect for installing a septic tank.
This material is not so difficult to find; it is available at enterprises that write off tires and tires as unnecessary. In addition, you can find advertisements from private individuals on the Internet. The best option is to go to a tire service station. There, there will be an abundance of old tires from various cars, and the owner of the service can give away heavily worn tires for free, thereby saving on their disposal.
However, it is still important to take into account several basic rules that will help you correctly build a cesspool or septic tank in a private house. Care must be taken to seal all joints and seams between the wheels to prevent wastewater from entering the ground.
It is worth deciding in advance on the type of structure and its location.
The location of the sewerage system must meet all the standards previously specified in the article. Also, the structure itself must be installed below the ground freezing level.
Provided that the dacha is rarely visited seasonally (for example, only for gardening or harvesting), there is no need to install expensive cleaning stations or. A sewer system operating without maximum load will make do with a simple pit, the walls of which are assembled from old car tires.
Into such a pit you can dump both water from showers and sinks, as well as the contents of home toilets. And construction work does not require any special skills from the owners. The cost of sewerage will be extremely low. After all, the main construction material You often get it for free from friends or neighbors who have replaced the old tires of their car with new ones.
At first glance, such a sewer pit has many advantages:
- it can cost the owners free of charge;
- construction takes a maximum of one day;
- Tires of any size can be used;
- You can build alone.
However, such a structure also has serious shortcomings, such as:
- short service life (on average up to 10 years);
- poor tightness of sections (in fact, its absence);
- the presence of an unpleasant odor;
- low productivity;
- impracticality of repair or dismantling.
In addition, a structure of this type is absolutely not suitable for areas with.
Ingress of sewage waste into surface and groundwater is fraught with the spread of infections dangerous to human health.Principle of operation
The pit is actually a settling tank with the ability to filter the contents into the surrounding soil. Through the gaps in the walls, the liquid gradually goes into the soil, and large organic matter settles to the bottom. Rotting is a mandatory attribute of a pit. 
At the same time, you cannot equate a classic tank with a septic tank built from tires! The latter has much less frequent pumping with the use of sewage disposal equipment.
If desired, you can build a simple cleaning system from tires. To do this, two pits (wells) are connected to each other by overflow pipes. The primary settling tank removes most of the large organic impurities. The second chamber contains only partially clarified water, which is absorbed into the soil faster.
In this case, the decomposition processes will accelerate and the presence of sewer odor will be partially reduced.How does it work?
A hole for tires is dug only in areas with deep groundwater! The minimum distance from the bottom of the structure to the upper water layer is 100 centimeters. 
The possible danger of contamination of drinking water should also be taken into account. Therefore, the pit is placed taking into account the characteristics of the soil and the distance to or. For sandstones this is 30 meters, and for clay soils - 20 meters. The structure is separated from residential buildings by at least 5-6 meters.
It is advisable to locate the structure on the natural slope of the site, that is, below the water intake level. Pipes and the sewer tank itself must be placed below the freezing point of the soil in a particular region! Some resourceful owners enclose both the pipes and the septic tank in a special wood box. This engineering feature prevents deformation during possible freezing of the soil.
What materials are suitable?
As mentioned above, any tires can be used. Naturally, these will be already used, fairly worn-out products. But wear will not affect the safety of tires in the ground– rubber does not rot and does not react with aggressive environments.
To increase the volume of the structure, it is advisable to choose tires from large vehicles (if possible) - trucks, tractors, buses. Tires for domestic passenger cars have metal carcass, providing additional rigidity.
How to build?
For the work you will need the following tools and materials: 
shovel and bayonet shovel;
- knife for cutting rubber;
- electric jigsaw;
- sewer;
- wire for fastening structural parts;
- cover (hatch) of suitable diameter;
- sand for sprinkling, but you can use regular soil;
- tires in the amount of 5-7 pieces (this is enough to serve two or three people).
Step-by-step installation looks like this: 
- Markings are made for both sections of the septic system. To do this, the tire is placed on the ground and the perimeter is marked.
- A common hole is dug with a small margin to ensure free movement when lowering the tires. The bottom of the pit can be covered with sand, clay (additional tightness is ensured) or filled with concrete (such a base prevents deformation during soil heaving).
- The design details are prepared - each tire is removed with a jigsaw top part, which ensures the most even surface of the walls (there will be nothing for impurities to linger on).
- The tires are lowered into the pit one by one and tied with wire. Additional tightness can be achieved by lubricating the joints with rubber glue.
- An overflow pipe is installed between the wells (about two-thirds from the bottom of the structure).
- The sewerage system is connected to the first well. To do this, a hole is cut in the tire. A rubber coupling and sealant are used for connection.
- The pit is filled with soil or sand. The backfill is carefully compacted along the perimeter of the structure.
- A lid is installed on top. This could be a polymer hatch, an iron or wooden cover.
- An access area is being built around it in case the vacuum cleaners are called. At this point, construction work is considered completed.
And to get rid of the unpleasant smell, you need to install a pipe. The closer the sewer drain is to residential buildings, the higher the pipe should be. Much also depends on the prevailing winds in a particular area. It is better to position the structure so that the wind carries the smell away from the house.
Errors made during installation are as follows:
- the slope of the main pipeline is not maintained - waste flows slowly, the pipe becomes clogged;
- the level between the inlet and outlet pipes is not maintained - the overflow pipe must be
- below the incoming sewer, between the wells it is also located at a slope of 20 centimeters;
- the structure is located above the freezing point of the soil - pipes suffer in winter;
- the structure is immersed in groundwater - the working tanks become silted, often float up, and the infection enters the soil.
Cost of construction
If the owners were unable to get tires for free, you can purchase a used set of two of these products at a price of 1,200 rubles. There are also cheaper options to choose from.
Construction work is carried out independently or with the assistance of a digger and plumber. The range of prices for excavation work ranges from 240-600 rubles per cubic meter of volume. Plumber services will cost from 500 rubles (relevant for the Moscow region).
How to use?
The use of such sewerage is subject to all basic rules applicable to any sewer systems.
Properly installed sewerage means: 
Once, when planning the reclamation work on my site, the idea of making a drainage pipe from old car tires seemed very attractive. What I liked most of all was that the tires themselves were free, it would seem that they were much cheaper. Conceived and done, description on page →, but during the process of this work the thought that I got involved in this work in vain did not leave me. In my opinion, a ready-made plastic drainage pipe is better in many respects, and if I did everything all over again, I wouldn’t bother with tires.
Tire pipe
the car won't hold up
Car tire is quite soft material.
 Somehow, seeing this product on a car, one gets the impression that it can withstand enormous weight. Alas, outside the wheel, without pressure, this product bends even under the weight of a person.
I saw a picture on the Internet showing a road exit and a pipe made of tires at the bottom. A car is driving across this bridge. Of course, if you pour a meter of soil on top of the tire pipe, then such a bridge will probably support a passenger car. Alas, a dump truck with sand will flatten such a pipe into a flat cake and will also stall at such a congress.
Tires will allow quicksand at the joints. You can connect them in different ways, but tight gluing will still not work, especially if you use rubber of different sizes and manufacturers. Considering that the tire is only 20 centimeters wide, there will be five such joints per meter.
To assemble this
pipes took 45 minutes
The solution is to wrap everything with spabond, but in this case there is no point in saying that the material is free.
Rubber tires must be fastened together. And the time spent on this is not so little. No matter how the pipe is ultimately connected, the labor involved in this work is not comparable to the ability to simply lay a finished drainage product.

Industrial drainage pipe
I connected the tires with a screwdriver using three screws, and it took me 45 minutes to assemble a 170 cm pipe (nine tires). It may not be that much, but in terms of 30 meters of ditch we can say that it took 2 working days just to assemble the pipe itself. (about this page → Drainage from car tires)
The tire has a large outer radius. And at the same time, the difference between the inner radius is significant. It turns out that you will have to dig a larger trench under the tire pipe than under a normal pipe. The difference is especially noticeable if a pipe is laid under drainage. It’s one thing to dig a trench the width of a spade bayonet, and another to dig a ditch 60 centimeters wide.
It will be very difficult to wash the tire pipe afterwards. You can insert a flushing hose made of rigid polyethylene tubing into an industrial drain pipe and push it forward while feeding water into it. This number will not work with tires; the tube will rest against the side walls of the tires and such a hose will not fit far.
Good reviews about the use of tires sound in terms of strengthening the walls of ditches. There they are not even fastened together and, covered with soil, they hold the almost vertical wall quite well. But turning a pipe out of them is still too labor-intensive and I finished my plan out of stubbornness → Drainage from car tires
Number of tires for 30 meters of drainage pipe
Tire drainage pipes


