Appeared on the construction and renovation market new technology entitled self-leveling floors 3d. In this article, we will look at the technology of applying 3D self-leveling floors, then we will look at how much self-leveling floors cost and watch a video with various works for general information. It’s worth noting right away that it’s very, very difficult to make this type of floor with your own hands...
3D self-leveling floors, application technology.
The first thing you need to do is choose the pattern that you want to project onto the floor.Then you need to draw it out using some kind of graphics program (well, like photoshop). The next step is to dismantle the old floor and, of course, pour a new one; it is necessary to level the floor according to the beacons, since you need to get a very flat surface.
Next, the picture must be applied to the floor. You can go two ways, either invite an artist, or the picture is broken into many small parts, which are printed on a dense basis. This dense base is then laid out on the floor.
After this, the floor is covered with a layer of durable material and dried.
Then polishing occurs and an amazing reflection effect and a very rich color are obtained.
Such self-leveling floors 3d Can be applied to both ceilings and walls. Such 3D floors cannot be scratched by heels or animal claws; the coating is very strong and durable.
How much do 3D self-leveling floors cost?
The price of a 3D self-leveling floor ranges from 4,000 rubles to infinity. The cost of a self-leveling floor without a pattern starts from 4,000 rubles, but a floor with a pattern starts from 8,000 rubles.Self-leveling floors 3D video.
This video presents works that give a general idea of what a 3d self-leveling floor can look like.Photo self-leveling floors 3D
Below is a selection of photographs of 3D self-leveling floors. The pictures are clickable; clicking on them will enlarge them.
|
|
|
|
|
|
|
|
In addition to these photos, on our DIY construction and repair blog, by clicking on the link photo gallery of 3D floors, you will find many photos with the most interesting works of 3D flooring technology.
Video of self-leveling 3D floors.
This video shows in detail the entire process of making 3D self-leveling floors.By the way, such a bright and interesting technology as 3D floors will look very impressive with such technology as stretch ceilings with a pattern Application technology and photography, about which you can read and not only read, but by following the link Photo gallery of suspended ceilings with photos, see photos of the most interesting works of the technology presented above and all this on our blog.
I saw this thing in one of my friends’ feeds - 3D floors. I didn't even know such things existed. Looks great...
3D floors are created according to the same scheme as ordinary self-leveling floors, only the designers first design a computer image, the sheet with which is laid on a prepared base. After this, the entire surface is filled with a thick layer of polymer, to which you can add coins, pebbles or sparkles for an additional effect. About a week after pouring, the 3D floor dries out and is covered with a protective layer of varnish.

3D floor is a polymer filling of a decorative image, which, after hardening, forms a continuous coating without seams. This technology allows you to make the floor an exclusive interior detail. The design of the floor depends on the imagination of the customer and his financial capabilities. The most interesting thing about this technology is that if you look at the floor from a certain angle, the image appears three-dimensional, enhancing the aesthetic effect. Among other things, such floors have very high performance characteristics. It is thanks to their strength properties that such floors are made not only in residential premises, but also in commercial ones. This floor will become great solution for decoration of all kinds of entertainment venues.

With proper use, a polymer 3D floor will look great even after several decades.
Self-leveling floors have the following outstanding qualities: continuity, strength, health safety, dust-free, fire resistance, non-slip surface, excellent resistance to ultraviolet radiation.
The disadvantages include only aspects related to manufacturing technology and care: the drying process takes at least 5 days; need for timely care; the cost is higher than budget solutions.

During pouring polymer floor, specialists will take into account the following set of factors: the expected level of humidity in the room, future temperature conditions, the intensity of movement of people and machinery on the coating, the likelihood of chemically active substances getting on the floor surface.
It is a careful study of the above nuances that characterizes a responsible approach to creating polymer 3D floor. The basic component of this floor is polyurethane. The technology of filling the floor involves obtaining the most smooth and even surface possible.

The main technological stages of pouring a 3D floor: proper preparation of the base surface (base); applying a decorative image; application of self-leveling coating; drying of the coating; giving the frozen surface a matte or glossy appearance. Competent compliance with each technological stages, guarantees a long service life of the floor. That is why it is important to attract exclusively qualified specialists to carry out this work.

Did you like anything?


But they say there are also luminous 3-D floors! Cool...


This is also a kind of 3D floor, only not drawn, but real.
In a hotel in Mexico, in one of the penthouse rooms, designer Hernandez Silva recreated a magnificent interior in which the visitor feels at home. While in this room, residents did not feel any pressure from the furniture or the interior itself. The most unusual thing in this room was the toilet! The designer placed the toilet in the elevator shaft. The floor of the toilet, oddly enough, was glass and made it possible to see the entire abyss underfoot. Yes, yes, exactly the abyss, since this room was located on the 15th floor of the hotel and not everyone could afford to calmly look at their feet.
Today, a bright and voluminous pattern can be created not only on the walls of an apartment, but even on the floor. Probably, most readers of the site have already visited exhibitions of 3D paintings that are popular today and even came to galleries of 3D drawings, where you can take unique and interesting photographs. And such works of art can be created even in your apartment. Modern construction technologies allow you to create 3D floors with your own hands, step-by-step instruction for the arrangement of which is given below.
DIY 3D floors - step-by-step instructions
3D paintings on the floor in the apartment are created using self-leveling floor technology. And before you have the opportunity to study the instructions for creating a unique pattern on the floor, you should get acquainted directly with this type of finish and find out its advantages/disadvantages.

So, a self-leveling floor in construction is a special type of screed, for the creation of which special self-leveling building mixtures are used. They are quite fluid, and therefore, during the process of pouring and drying, they manage to be evenly distributed over the surface of the subfloor and make the final surface almost perfectly flat.

On a note! The minimum thickness of the self-leveling layer is 3.5 mm.
Self-leveling floors can be divided into two types:
- with finishing coating which, after drying, becomes the final floor covering;
- quick drying concrete screed, which allows you to prepare the subfloor for installation various types floor covering.

The article will talk about the first type of floor finishing, in this case the finishing layer will be applied. A full-fledged 3D floor can be called when a pattern is applied to it in a special way, which from the outside appears three-dimensional. Creating such a floor is a special chic and an opportunity to give the premises uniqueness and originality, because on the surface of the floors you can reproduce any designs, even those created independently.

Self-leveling floors can be used not only in residential premises - they can also be created in warehouses, gyms, shopping centers, etc.

3d self-leveling floors
Installation of self-leveling floors
Any self-leveling floor consists of several layers - there can be 3 or 4 of them. As a rule, this is a subfloor, a primer layer, a leveling layer, and a finishing layer. In this case, a construction mixture is used as a leveling layer, and a special polymer mixture (two-component) is used to create the finishing layer.

The desired pattern, by the way, is not created on the surface of the finished floor - the image is placed between the leveling and finishing layers.

On a note! The thicker the finishing layer, the more obvious the 3D effect will be. This part of the structure of self-leveling floors is responsible for the depth/volume of the picture.
The self-leveling floor itself, sometimes called “liquid linoleum,” has no gaps or cracks. Coating thickness – up to 7 mm. This finish can feel like tile to the touch.

Pros and cons of self-leveling floors
One of the main advantages of self-leveling floors is the ability to make the floor covering original and unique. , patterns on linoleum, PVC tiles and other options for materials for decorating floors have already become boring to many, and self-leveling flooring allows you to change the room beyond recognition.

Other advantages of self-leveling floors:
- during pouring there will be no gaps or cracks between the rooms;
- high strength characteristics;
- easy to maintain - the surface is easy to clean;
- attractiveness and uniqueness appearance– self-leveling floors will make the room unique;
- high resistance to various chemicals;
- the opportunity to realize your wildest fantasies;
- compatibility with any interior style;
- high moisture resistance;
- excellent heat resistance – compatible with various systems underfloor heating.


Also, self-leveling 3D floors have disadvantages - yes, this is far from an ideal coating. The disadvantages of this type of finishing are as follows:
- the complexity of both installation and dismantling - in both cases, large labor costs will be required;
- A glossy floor gets scratched quite quickly. Based on this, another drawback of self-leveling coating appears - the need to take protective measures in order to keep the surface in good condition for as long as possible;
- creating a self-leveling floor is not a cheap pleasure, since you will need quite a lot of materials, tools and equipment.


Attention! When creating a self-leveling 3D floor, it is important to strictly follow all the technology. Otherwise, there is a risk that the floor will quickly become unusable.

Types of self-leveling floors
There are 4 main types of self-leveling floors - they differ depending on the components that are part of the mixtures used to create them. In general, the technology for their application is similar.
Table. Types of self-leveling floors.
| View | Characteristic |
|---|---|
| This type of self-leveling floor is based on methyl methacrylic resin. The coating behaves well indoors and outdoors. It is often used in various facilities in various areas of industry. Resistant to high and low temperatures, is not afraid of ultraviolet radiation, depending on certain additives it can slightly change its properties. It is resistant to aggressive environments. It polymerizes quickly, and pouring work can be done even at sub-zero temperatures. Disadvantages - the need to work very quickly, as the coating dries quickly. Requires professional help. Has an unpleasant pungent odor. |
| The most commonly used type of coating, it is durable, lightweight, and durable. The coating is not afraid of exposure to water and temperature changes, and is resistant to impact loads and abrasion. It is characterized by high levels of hygiene, therefore it is recommended for use in medical institutions and food premises. The main disadvantage is the importance of careful preparatory work(base preparation), and installation should be carried out at low humidity. Another disadvantage is the significant costs of building materials. |
| The base is epoxy resin. Such floors can be installed on wooden, concrete, or metal bases. Resistant to abrasive substances and not afraid of chemicals. They are often installed in pharmaceutical and food production facilities and laboratories. Advantages: ease of maintenance, high resistance to chemical and mechanical influences, environmental friendliness. Disadvantages - they are inelastic, and therefore are easily damaged in the event of strong blows. |
| The basis of this floor is cement, polyacrylate copolymer, and a special filler. Previously, such floors were created only in food production areas, where various loads are often moved and the floors are subject to heavy loads, are constantly disinfected, quickly get dirty and are subject to constant cleaning. Self-leveling cement-acrylic floors are not afraid of water, chemicals, or mechanical influences. They do not slip (matte), do not peel off, and cope well with temperature fluctuations. The main disadvantage is that they are difficult to install. |
If we compare all of the above types of floors, we can conclude that polyurethane and epoxy floors can be made independently. As for methyl methacrylate, they are not recommended for use for independent construction work. The most flexible are polyurethane floors, but epoxy floors are not afraid of chemicals. Cement-acrylic mixtures can be used to level the rough coating.

On a note! In addition to the main four types of self-leveling floors, there are also a lot of combined coatings.

DIY 3D floor
Creating a 3D floor in your home yourself is quite difficult, but possible. The process takes place in several stages: making calculations and preparing the base, creating a leveling layer, applying a pattern and then the finishing layer. It is the latter that will provide that very 3D effect that people like so much.
Attention! To achieve the desired effect, transparent materials are used as a finishing coating.

Materials and tools
In order to create a 3D floor, certain materials and tools are required:
- primer necessary for treating the subfloor;
- a polymer mixture, thanks to which a leveling layer will be formed;
- the design itself, which is usually made on banner fabric;
- a transparent two-component polymer that will act as a finishing coating;
- an adhesive composition, thanks to which the pattern will be fixed on the leveling layer;
- protective varnish used to cover the topcoat;
- masking tape;
- polyethylene film;
- spatulas;
- rule;
- brushes;
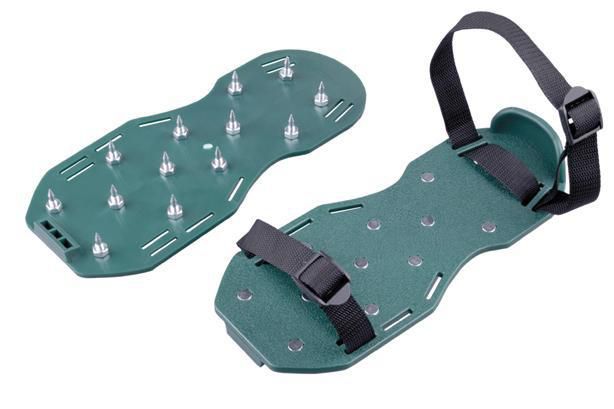
- special shoes.

masking tape
If the drawing is created manually, you will need acrylic paints and brushes. A protective composition will also be useful, which will ensure the safety of the drawing.

Preparation and calculation
So, one of the initial stages is to calculate the amount of required consumables. The consumption will largely depend on the condition of the subfloor (base), the thickness of the layer, as well as the material used (information on consumption can be found on the packaging).

To create a self-leveling floor 3 mm thick, you need to spend about 4 kg of construction mixture per 1 m 2. Based on this, the necessary calculations can be made. The average cost of 1 m 2 of self-leveling floor with a 3D pattern will be about 6,000 rubles. Costs can be reduced slightly if you do all the work yourself. By the way, the most expensive part of the entire self-leveling floor is the design printed on the banner.

Attention! Self-leveling floors with a 3D pattern will look good only on areas larger than 10 m2. You shouldn’t create them in small rooms - the whole drawing will simply be lost and unnoticeable.
How to prepare a drawing
To begin with, you should choose the drawing that you would like to see every day. You should approach the choice of illustration very responsibly, since you will have to live with it for a long time. It is necessary that it fits the interior - you shouldn’t paint dolphins in the room, unless, of course, the design main room not made in a nautical style.
On a note! If you want to create a drawing yourself, then you should not choose a complex image if you do not have the skills of an artist. Let it be better if the picture is simple, but memorable and pleasant.

The selected design should be printed on banner fabric. This can be done at any agency that deals with outdoor advertising. By the way, they can also help you with choosing a design. It is very important to clarify with the company the technical parameters of the final work - the illustration must be printed with a resolution of at least 1440 pixels on matte satin.

Step-by-step execution of work
After the drawing has been selected and printed, all the necessary tools and materials have been purchased, you can begin the work itself.
Step 1. The first stage is preparing the base. The subfloor is thoroughly cleaned of debris and dust. The surface is degreased if there are stains of oil or paint on it. All cracks and chips are sealed with sealant, irregularities are sanded. The surface is thoroughly dried (acceptable humidity levels for the base are no more than 4%, air humidity is no more than 50%).

On a note! If the subfloor was poured over a new one, then at least 30 days should pass before installing the self-leveling floor.
Step 2. The surface is primed with a special primer mixture for self-leveling floors. The mixture can be applied with a roller or spatula. This is necessary so that the base and the leveling layer are connected very firmly.

Step 3. After the primer has dried (about 4 hours), white epoxy material is poured onto the surface to level the base. Leveling the layer is done using a wide spatula. You must wear special spiked shoes (paint shoes) on your feet, which will allow you to walk on wet surfaces.


Step 4. The surface is treated with a special needle roller. This will remove excess air from the thickness of the material. The surface is dried for at least 24 hours, after which the evenness of the layer is checked.

Step 5. The drawing is applied (paint, banner fixed, etc.). The base layer is primed, a transparent polymer solution and a solvent are applied to it, mixed in a 2:1 ratio - an adhesive solution for a banner. The finishing material can also serve as an adhesive composition. It is applied to the rough surface, and a banner is glued on top. It is very important to expel all the air from under the banner fabric. The work can be done with a clean roller.
On a note! It is very convenient to use a self-adhesive banner for applying a design, which works on the transfer principle. Removed from one of its sides protective film, the design is glued to the surface and rolled with a roller.

Step 6. The amount of polymer mixture of the finishing layer is calculated - it will depend on the required thickness and floor area. On average, consumption is 4-4.5 kg/m2. Next, the material is poured onto the surface of the banner and carefully leveled. The air is expelled with a needle roller. Next, the floor is covered with plastic film until completely dry, and then varnish is applied to the surface, which will protect the surface from mechanical damage.

Video - How to make 3D floors
A few tips will help you create 3D floors as quickly and efficiently as possible:
- during the installation of self-leveling floors, in order to protect them from cracks, it is recommended to lay a damper tape along the walls;
- there must be good ventilation in the room where work is being carried out;
- It is important to use a respirator during work;
- It is advisable to fill the floor at an air temperature of at least +10 degrees;
- The finishing layer must be leveled within 30 minutes, as it dries quickly.

Proper surface care
Caring for self-leveling floors is simple, but it must still be done regularly to preserve the beauty of the coating for many years. For example, every 6 months a special mastic should be applied to the surface, and when repair work the floor should be covered with covering material. Also, special protective caps are put on furniture legs or pads are used.

Self-leveling floors should be washed with an aqueous solution of detergent, and then wiped with a clean cloth.
Attention! Do not use substances containing chlorine or acids to clean self-leveling floors.

After putting in some effort and spending a lot of money, you want to get the perfect job right away. However, creating a self-leveling 3D floor is not an easy task, so you should be prepared for the fact that you won’t get a beautiful coating the first time. However, over time you will be able to practice, and the drawings on the floors will turn out better and better.
Self-leveling flooring is a seamless polymer coating that has a number of advantages over other types of floor coverings. Its distinctive features are:
Durability;
- strength;
- wear resistance;
- aesthetic appeal;
- abrasion resistance;
- hygiene;
- fire safety;
- waterproof.
In addition, self-leveling floors made of polymer materials do not slip, are not destroyed under the influence of aggressive chemicals and ultraviolet rays, and have an antistatic effect. To clean the coating made of polymer materials, no aggressive household chemicals are required: you can remove dirt from the self-leveling floor by wiping it with a wet cloth.
When properly poured with a polymer composition, finished floors retain their properties for several decades.
Manufacturing technology of self-leveling 3d floor
Self-leveling 3D floors are a coating that consists of a polymer base layer, a decorative middle layer and a transparent top layer. Making such floors requires time, experience and some effort. That is why their cost is significantly higher than the cost of any other floor coverings.
Before applying the polymer coating, it is important to properly prepare the concrete subfloor. It is necessary to thoroughly dust it with a vacuum cleaner and then prime it. It is advisable to mix the top layer of primer with quartz sand. Using this measure, you can increase the adhesion of the concrete base and avoid the appearance of defects in the finished product. floor covering.
If the technology for laying the polymer composition is violated, there is a high probability that the finished self-leveling floor will become covered with bubbles, or even peel off completely.
Upon completion of the preparatory work, it must be applied to the concrete surface. polymer base. Its thickness is usually 1.5-3 mm. When this layer is dry, you need to coat it with varnish.
The next step is laying the sheet with the 3D image. It is usually done using computer programs. This can be either a pattern or picture, or a three-dimensional company logo (if 3D floors are installed in an office, shopping center or any industrial premises). In addition, the middle layer may include various decorative elements. These can be shells, coins, fragments, sand, wood chips, etc.
At the end of this stage of work, a final transparent polymer coating is applied to the image. With good ventilation of the room, after 5-7 days the self-leveling 3D floor will finally harden and be ready for use. The price of such coverage is quite high. Cost of one square meter floors made using this technology start from 3-5 thousand rubles.
The technology for manufacturing self-leveling floors with a 3D effect, which has become widespread in industrial and civil construction, has significantly expanded the possibilities for implementing the most daring design ideas. How 3D floors are made and why manufacturing technology requires strict adherence to all operations without exception will be discussed in this material.
The process of manufacturing floors with three-dimensional images includes three main stages, which, in turn, are divided into several intermediate operations:
- Preparing the base which begins with pouring the concrete screed and continues with drying, priming and final leveling of the surface;
- Applying the actual decorative coating, when various primers, glaze paints and three-dimensional designs on a self-adhesive base or applied with a special glue are used;
- Applying the final protective layer, allowing you to obtain not only a wear-resistant coating, but also visually increase the depth of the applied image.
Self-leveling floor technology

The technological map for 3D floors indicates exactly which components are used when performing a particular technological operation. It details the drying and polymerization time, the application time of the compositions and the order of work. Most often, polyurethane or epoxy-based materials are used to produce self-leveling floors with a three-dimensional pattern.
Advice: To obtain a durable, wear-resistant coating, it is strongly recommended to use 3D floor materials from one manufacturer, which are balanced in technical and chemical characteristics and represent a complete system that provides best quality finished floor.
Preparing the base

Self-leveling polymer floors are installed on a solid concrete base, which should not have visible or hidden damage, inclusions of separating materials and traces of any contamination, therefore, before making 3D floors, it is necessary to carry out a number of preparatory operations:
- Checking the concrete base for damage, which is carried out by visual inspection, tapping the floor surface or using special radio frequency or ultrasonic meters. Modern devices accurately detect the presence of cracks or voids even in a fairly thick layer of concrete;
- Repair of concrete base with special repair mixtures. In case of significant damage or impossibility of repair, it is necessary to re-manufacture concrete screed. To ensure maximum strength of the floor with a small coating thickness, the old base must be destroyed to the state of medium-fraction crushed stone and then a new coating must be poured. If the layer thickness does not exceed 40 mm, a special reinforcing mesh is used when installing the screed;
- After repair, the screed must be dried until moisture is completely removed, and the new base must be kept for 28 days with periodic moistening to gain the necessary strength;
- The base intended for applying 3D images must be absolutely flat, without cavities, subsidence and other possible defects. For final leveling, it is best to apply thin-layer self-leveling floors based on cement binders, which are applied to a previously primed screed.
The video demonstrates surface preparation before pouring
Drawing

High-quality application of a pattern to the prepared floor surface provides approximately half the success in the manufacture of three-dimensional floors. The slightest fold or air bubble instantly distorts the picture and destroys the three-dimensionality of the image. Therefore, before making 3D floors, you should not neglect some additional operations:
- Cleaning, if necessary, washing the floor with special cleaning compounds using an industrial vacuum cleaner. Not the slightest grain of debris or the slightest speck of dirt should remain on the entire surface of the floor;
- Drying the base and applying a special primer that increases adhesion;
- Applying a design on a self-adhesive vinyl base or made on special paper and glued to the base using special glue;
- The final operation after applying the pattern is to control the surface moisture before applying the protective layer. This operation must be approached very carefully. Concrete bases must have a moisture content of no more than 6% to prevent the polymer from peeling off from the base.
The video shows the drawing process
Application of a transparent layer of polymer and protective varnish

Protective coatings for the manufacture of floors with three-dimensional images can be epoxy-based or based on polyurethane composites. Moreover, these can be either one or two-component compositions. There are some differences in how 3D self-leveling floors are made on an epoxy or polyurethane basis, but, in general, the technological operations are similar:
- When using this or that mixture, you should strictly follow the manufacturer's instructions. When pouring, special attention should be paid to the “survival” time of the composition, during which it retains the ability to spread;
- When pouring, it is necessary to prepare successive portions of the composition in a timely manner in order to avoid the appearance of heterogeneity of the coating and visible steps between the filled areas of the floor;
- Leveling the poured mixture is carried out with a special squeegee with an adjustable coating thickness and a needle roller, which serves to improve spreadability and accelerate the removal of air trapped in the polymer layer;
- To create an impact-resistant wear-resistant coating, depending on the chosen polymer, an additional layer of protective varnish can be applied to the floor surface, which further increases the “depth” of the image.
Having completed all the technological operations, it is necessary to keep the coating for 3-4 days for final polymerization, after which the floors are ready for use.
You got a rough idea of how 3D self-leveling floors are made. Despite its apparent simplicity, pouring polymer floors is a rather complex undertaking that requires coordinated actions of the construction team, and precisely timed ones. Even after watching a video on how to make 3D floors, you should not take on the installation of them alone, especially with large areas. The slightest inaccuracy can ruin the results of the work done, and dismantling polymer floors is very difficult due to their high strength.


