We will send the material to you by e-mail
It is rare that an apartment renovation is complete without wallpapering. This universal view decorative coating is suitable for any interior, it is loved for its ease of installation and perfect look.
Wallpaper - a coating that is found in every second modern apartment
With your own hands - the task is not difficult, especially if you have all the necessary tools. Experienced people get by with a brush and roller, but other devices may come in handy for a beginner:
- paint bath and roller for applying glue. It is better to choose a roller with a pile of medium length, and the dimensions of the bath should correspond to the roller. You can replace it with a wide brush with a comfortable handle. In addition, keep a small brush handy for gluing seams;
- rubber roller for smoothing streaks on the wall and removing air bubbles on thin wallpaper. For thick ones, instead of a roller, you can use;
- a roller with a roller for pressing the web in the inner corners;
- container for dilution of glue: it is better to use a large pot or bucket with a lid. Airtight dishes will allow you to keep ready-to-use glue for several days;
- drill or construction mixer for mixing glue. If we are talking about a small amount of work, you can do it manually;
- pencil, long ruler, tape measure and scissors for marking and cutting canvases. For cutting, you can use a construction knife - the edges are smoother;
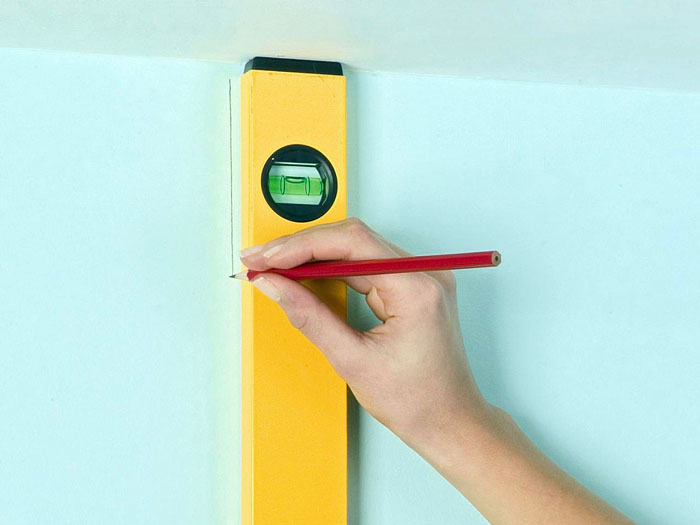
- a plumb line or building level for marking the vertical line from which you will glue the wallpaper;
- a sponge to remove excess glue and a dry rag for cleaning up debris.
In addition, in fact, the wallpaper itself, you need to prepare the glue. The composition is selected in accordance with the type of coating. You can buy glue at the store and dilute it according to the instructions.
Note! Instructions for the preparation of glue is placed on the package. It indicates the proportions of water and powder, the consumption of glue for square meter surfaces and application specifics.

The preparatory stage before sticking wallpaper on the wall with your own hands
Do not rush to immediately start wallpapering. It is not enough just to purchase tools and materials, you still need to carry out preparatory work. Examine the condition of the walls, remove the old coating and carefully prime the surface.
How to remove the old coating from the walls
If previously the walls were already decorated with wallpaper, they must be removed. In most cases, the material is easily torn off, but if you have pieces or whole strips that cannot be torn off, you will have to use special tools. Compositions for removing old wallpaper can be bought at the store, but it is cheaper and easier to make such a mixture yourself. The recipe is simple: add dishwashing detergent and a little wallpaper paste to warm water. Using a sponge, the agent is applied to the wallpaper and left for half an hour until the coating softens.
Ask a Question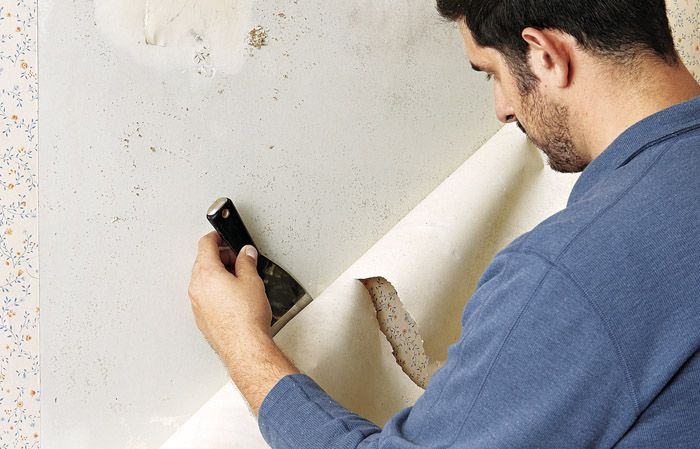
“Any alignment of the walls is accompanied by the formation of a large amount of debris and dust. Remember to use a respirator to protect your respiratory tract and close the doors to other rooms."
Wall primer
Do not neglect the primer of the walls. If you skip this stage of preparation, you risk getting an extremely unpleasant result - the wallpaper will simply peel off. In addition, the primer will even out the color of the wall, and the gray concrete will not show through under a thin coating. The primer mixture will fill the voids in the porous surface, you spend less glue.

For walls made of, concrete and wood, a universal acrylic primer is used. It is easy to apply, diluted with plain water and dries fairly quickly.
For your information! Unscrupulous sellers can offer you, instead of acrylic primer, a solution of PVA glue. Be careful, outwardly the compositions are very similar, but the glue has a specific smell.
For walls made of wood, plywood or alkyd primer can be used. It dries for a long time - almost a day, but provides excellent adhesion even for heavy wallpaper. Metal walls are treated with a glyptal primer similar to enamel. Only she guarantees you high-quality coverage. The same primer can be used for plastic. This coating will dry overnight. Another option for a mixture for metal is perchlorovinyl primer, but it is not recommended for use in residential areas due to its high toxicity.

How to glue wallpaper - basic techniques
After you have prepared the walls well before the main stage of work, you need to solve several important questions: where to start gluing, how to properly cut the wallpaper and paste it in difficult and hard-to-reach places.
Related article:
interesting solutions for the living room, bedroom, children's room, kitchen and corridor. The basic rules for selecting canvases and recommendations from designers - read in our review.
Where to start gluing wallpaper and how to fit the pattern
Wise with their own experience, older relatives will tell you that you need to glue the wallpaper from the window. Indeed, the old paper panels were glued in this way for one simple reason: the joints were overlapped, and so that when natural light the seams were not conspicuous, they had to be directed away from the window. Modern manufacturers offer panels that are glued end-to-end. Such seams are less noticeable, but they require a perfectly even base. So the question of where to start work becomes less relevant: start from any side on which it is convenient for you to draw a vertical, and glue in a circle.

Pay attention to several important nuances:
- how the wallpaper will look in the opening between the windows. It is not always good if a seam is placed in a narrow opening;
- where the furniture will be. If you plan to put and do not place wallpaper behind it in order to save money, you need to decide on a starting point;
- if you plan to place it on one of the walls, you need to evenly measure the location of the pattern and continue pasting from this place.
The first canvas is the most difficult task. It is important to place it strictly vertically so that the slightest skew does not spoil all the work later.

Expert point of view
Dmitry Kholodok
Technical director of the repair and construction company "ILASSTROY"
Ask a Question“If you use a plumb line, rub the rope with chalk or paint. Fasten the top end of the plumb line and pull the bottom lightly - the paint will remain on the wall and mark the desired line.
Most often, rooms in apartments have imperfect corners. Therefore, it is better to mark the vertical on each wall. Wallpapering technology requires pattern fitting. Fashionable finishes are distinguished by complex ornaments and bright images. You should be aware that on the wallpaper packaging, manufacturers indicate the offset distance to fit the pattern. But in practice, it is easier to do the adjustment manually, visually combining the pattern. And this should be done not only at the stage of cutting the canvases, but also in the process of gluing them.
Video: wallpapering with a large pattern
Glue on the wallpaper or on the wall - how to apply it correctly
The answer to this question depends on what type of wallpaper you have chosen for your renovation. If you have paper wallpapers at your disposal, the glue is applied directly to the canvas. For reliable gluing of thick vinyl or non-woven coatings, the adhesive composition is applied to both the wallpaper and the wall. Non-woven wallpaper can be glued without applying the composition to the canvas, limited only to the processing of the wall.
How to glue wallpaper in the corners of a room
Most often in the process of work you have to deal with internal corners. Here you should make sure that the strip covers the corner and a few centimeters behind it. Even if the canvases are glued end-to-end, you need to overlap in the corners. Only in this way will you get an even angle. Use a level or plumb line as a guide. So that the overlap is not noticeable on thick wallpaper, after gluing, cut both layers along the ruler sharp knife, and while the wallpaper is not dry, remove the excess stripes from one side and the other. If necessary, add glue with a small brush.
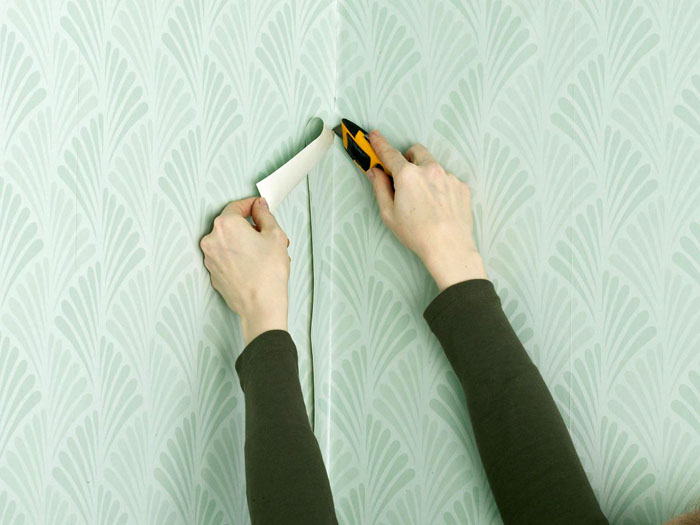
You will also have to tinker with the outer corners. They are rarely perfectly even, so here you also need to use an overlap of 3 centimeters. After the first canvas has been glued, you need to cut it off, leaving a thin edge at the corner. The second strip is aligned vertically on the other wall and fixed so that there is a minimal overlap on the first panel. How to glue wallpaper in the corners in a short video course.
How to glue wallpaper near windows, doors and behind the battery
So, you glue the wallpaper with your own hands, and you have reached. Feel free to fasten the new canvas so that an entrance to the window is formed. If you need to seal the slopes, make two horizontal cuts and bend the panel. If it does not reach the frame, you will have to make another cut, it is advisable to dock it at the corner (see gluing technology outside corners described above).

is a serious obstacle. You can’t place wallpaper behind them, so you have to cut them off. This must be done so that it is not noticeable that there is a bare wall behind the battery. To do this, leave a part of the canvas so that it goes 10 centimeters onto the radiator, and then tuck it behind the device, pressing and smoothing it with a spatula. How to glue the wallpaper yourself behind the battery in the video.
How to make seams invisible
Why can the seams between panels remain visible? There are several reasons for this effect:
- defective coloring of the edge of the wallpaper. A minimum strip of tenths of a millimeter without paint can cause the seams to be visible;
- an error in gluing the canvas - a skew in one direction leads to minimal overlap or a gap;
- loose adhesion of the material to the base, part of the strip may lag behind due to an air bubble.

It happens that you noticed the marriage too late, what to do? There are several ways to mask the seam so that it becomes invisible. If you get an unplanned overlap, you just need to cut through both canvases as you would when working with internal corners, and remove excess strips.
Important! In order for the edges of the wallpaper to adhere tightly to the base, additionally coat them with glue and roll them with a rubber roller.
Notice the uneven coloring of the edge? It is best to return such wallpapers to the store, this is a defective product. If for some reason this is not possible, for example, you bought the material in another city, then try cutting off the unpainted edge. This is difficult, and new joint problems will inevitably arise. It is best to do this during the gluing process, specifically overlapping and cutting off the edge already on the wall. As an alternative to this method - the use of a suitable color paint. It is better to take the color half a tone darker.
How to stick wallpaper of different types
A wide range of wallpapers in modern stores includes products not only for every taste, but also for every budget. You can limit yourself to buying cheap paper-based wallpaper or purchase more expensive non-woven or vinyl options. Is there a difference in gluing different types wallpaper?
How to glue paper wallpaper
Paper is an inexpensive and environmentally friendly coating. Experts advise when gluing paper finishes to apply glue to the panels. Keep in mind: the paper quickly absorbs the glue, so you have to work very quickly, otherwise the strip will get wet and will tear when glued.

Do not be alarmed if, even after careful leveling, irregularities appear on the surface after a few minutes - after drying, the canvases will “pull up” and be even again.
How to glue vinyl wallpaper
For vinyl wallpaper, you definitely need to purchase a special glue. This material is thick, and should only be placed end-to-end. On the packaging of vinyl wallpaper, they usually write what glue should be applied to: on the panel or on the wall. Unlike paper, vinyl strips should soak with glue within 10-15 minutes. The video below gives instructions on how to glue vinyl wallpapers do it yourself:
Article
In this article, you will learn how to glue wallpaper on the wall with your own hands. Before pasting wallpaper, you need to carefully clean the room. The quality of future walls depends on the cleanliness of the room;
The outer parts of the switch, sockets (telephone wires, cables) must be removed in advance;
Break up the glue.
- Measure from the corner a distance equal to the width of the wallpaper panel minus 1.5 cm and put a dot here. Mark where the seams will go and, if necessary, move them slightly.
![]()
- Using a level with a ruler, draw a vertical line through this point. On the wall where the wall wallpaper pattern should be combined with the wallpaper on the ceiling, draw a vertical line from the first seam at the wallpaper pasted on the ceiling.
- Paper wallpapering read

- Cut and prepare the first piece of wallpaper. Straighten first upper part accordion-folded wallpaper. Stick the wallpaper in a vertical line so that the panel has an allowance of about 5 cm on the ceiling. Make sure that the pattern is not cut off at the ceiling line.

- Cut the top corner of the wallpaper so that the wallpaper in the corner does not wrinkle. With your palms, move the wallpaper panel so that it snaps into place, and its edge follows a vertical line. Smooth out the wallpaper with a smoothing brush.

- Straighten the bottom of the wallpaper panel and use your palms to move the panel so that its edge follows a vertical line. Smooth out the wallpaper with a smoothing brush. Check carefully for bubbles.

- Use a sharp wallpaper knife with interchangeable blades to cut off the excess. If the ceiling is already pasted over, bend the edge of the wall paper with a wide spatula, and then cut off the bent part with scissors so as not to damage the wallpaper pasted on the ceiling. Rinse off all glue from the surface of the wallpaper.

- Hang the next piece of wallpaper edge-to-edge so that the pattern matches. Leave the wallpaper hanging like this for about half an hour, and then lightly roll the seams with a roller. On embossed or textile battens, lightly tap the seams with a smoothing brush.

- Turn off the power and hang wallpaper over outlets and light switches. Make small diagonal cuts to expose the outlet. Cut the wallpaper along the edges of the electrical panel with a knife with replaceable blades.
- Cut and prepare a whole panel of wallpaper. While the wallpaper is saturated with glue, measure the distance from the edge of the previous pasted panel to the corner at the top, middle and bottom of the wall. Add 1.5 cm to the largest of the measured values.

- Align the edges of the folded wallpaper. Measure from the edge at two points the distance equal to the value obtained in step 1. Attach a ruler to these two points and cut the wallpaper with a sharp wallpaper knife.

- Stick the wallpaper on the wall so that the pattern matches the pattern on the previously hung wallpaper. An allowance of about 5 cm should remain on the ceiling. Using your palms, gently butt the edges of the wallpaper panels. The panel of wallpaper should slightly overlap the unfinished wall.

- Make small narrow cuts in the corners at the top and bottom of the panel so that you can stick the wallpaper in the corner without wrinkling. Smooth out the wallpaper with a brush, and then cut off the excess at the ceiling and at the baseboard.

- On an unglued wall, measure from the corner and mark with a dot a distance equal to the width of the remaining wallpaper strip plus 1.5 cm. Draw a vertical line from ceiling to floor in this place. Using the same method, cut a new strip of wallpaper of this width, starting at the front edge of the new panel, so that the patterns match in the corner.

- Place the new cut strip on the wall with the cut edge in the corner and the uncut edge in a vertical line. Press the panel against the wall and smooth it with a brush, and then cut off the excess at the ceiling and at the baseboard.

- If you're using vinyl wallpaper, fold back the edge at the corner and apply vinyl adhesive along the seam. Press the overlapping panel evenly, wait half an hour, and then roll the seams with a roller and wipe the area with a damp sponge.

Option. Protruding corners, as a rule, can be pasted over without cutting the wallpaper. If the corner is not vertical, follow the instructions for taping inside corners, but the measured value obtained in step 1 does not add 1.5 cm, but 2.5 cm.
Most owners prefer to glue wallpaper in their apartments on their own, without asking for help from specialists, since these works seem simple and, at first glance, do not require special skills and knowledge. In addition, the services of professional workers will result in additional costs. However, the quality of the work done often leaves much to be desired. In order for the new interior not only to please the eye with an updated color scheme, but also to look neat and professional, it is worth remembering the most common mistakes when sticking wallpaper, as well as how to avoid them.

Mistake #1 - Incorrect wall preparation
The first and perhaps the most basic mistake in wallpapering is improper wall preparation. A fatal mistake would be sticking new wallpaper on old sheets or paint. Sticking wallpaper on an unleveled and unprimed surface will inevitably lead to partial or complete peeling of the wallpaper. Therefore, before carrying out work, it is necessary to thoroughly clean the wall of old materials and level it with putty, then clean the surface of the wall with sandpaper and prime or cover with wallpaper glue diluted in the primer. After performing these works, the walls must be allowed to dry completely, otherwise the high humidity will lead to flaking of the canvases.
You may find it useful

Advice: to check the cleanliness of the wall surface, you can use ordinary tape. Stick a small piece on the wall surface and peel it off after a while. The absence of small particles on the sticky surface of the tape indicates its purity. After that, you can safely proceed to gluing.
Mistake number 2 - poorly selected glue
The next mistake is the wrong wallpaper glue. To date, manufacturers offer a huge number of different types of wallpaper. All of them differ not only in pattern and color, but also in density. Therefore, for thinner paper wallpapers, it is not recommended to use too thick an adhesive composition, and for denser or so-called “heavy” wallpapers, for example, non-woven or vinyl, on the contrary, you should use a thicker glue intended for this type of wallpaper. In this case, it is important to soak the wallpaper canvases well (the solution is applied from the center to the edges), and then carefully smooth them over the wall surface. If the wallpaper is very heavy, then not only the wallpaper, but also the wall should be coated with an adhesive solution.
When buying wallpaper and glue, consult the seller. Thus, you will save not only time, but also protect yourself from the possible consequences of improperly selected glue.
You may find it useful

On a note! If you decide to make cosmetic repairs in rooms such as the kitchen or bathroom - that is, in rooms with high humidity - then you should opt for glue with fungicidal and bactericidal additives. They will help protect the walls from fungus and mold.
Error number 3 - oblique seams
Slanted seams are also a fairly common mistake. This problem occurs with uneven gluing of the first web and manifests itself in the form of a significant skew when applying the following strips. This can be corrected only by a complete re-gluing of the wallpaper. To avoid this unpleasant procedure, mark the place of gluing the first canvas with a plumb line, which can be used as a thread with a weight attached at the bottom. You can also use the level by initially drawing a vertical line across the entire surface of the wall as a guide.
You may find it useful

Important! Very often, they try to straighten a crookedly pasted strip of wallpaper by pulling and pulling it. This gross mistake leads to material damage. If you glued the strip unevenly, then it is better to remove it and glue it again.
Mistake No. 4 - incorrect fit of the joints
Incorrect fitting of joints is another common mistake when wallpapering, which can cause gaps between the canvases. It is important to bear in mind that some wallpaper may shrink during the drying process. Therefore, before starting work, you should conduct a small experiment: spread a small piece of wallpaper with glue and let it dry completely. If, after drying, it has clearly decreased in size, then such wallpaper should be glued with an overlap (as a rule, 5 cm in stock will be enough to avoid the effects of shrinkage). After the wallpaper has dried completely, cut off the excess at the joints with a sharp wallpaper knife and jointed ruler.
Warning! Do not do the work in separate stages. For example, in no case do not cover all sheets of wallpaper with glue, so that you can stick them one by one later.

Advice: To make the joints less noticeable, the wallpaper should be glued taking into account the organization of the light space in the room: if you chose thin paper wallpapers and decided to overlap them, then the work should be carried out moving from the window into the interior of the room.
Mistake number 5 - swelling and creases
Blisters and creases after gluing may be the result of improperly prepared glue or non-compliance with the temperature regime in the room. Carefully follow the instructions on the can of adhesive solution. Wallpapering should be done with closed windows and constant room temperature. The optimum temperature for wallpapering is considered to be from +18 to +23 degrees Celsius. If you carry out wallpapering work in very hot and dry weather, you should take care of pre-wetting the room with water containers or a humidifier placed in several places. It is strictly forbidden to ventilate the room for at least the first day after completion of work - this can provoke premature peeling of the wallpaper. Also on the first day after work, you should avoid getting direct sun rays on the surface of the walls.

Advice: when bubbles appear, draw the adhesive into the syringe, pierce the bubble with it and inject the glue inside, then gently smooth the surface.
To prevent wrinkles from appearing on the wallpaper, immediately after transferring the canvas to the wall, smooth it from the center to the edges. To smooth paper wallpaper, it is better to use a soft cloth or roller, for non-woven wallpaper, a special spatula or rubber roller is suitable, and for vinyl wallpaper, a plastic spatula or a hard brush. In no case should you use wet or even slightly damp tools and tissues, as this will cause irreparable harm to your repair.
Wallpapering indoors is a very responsible and time-consuming undertaking, which very often requires the involvement of assistants, since it can be very difficult to cope with the tasks on your own. But if you take into account the following recommendations, you can paste on high level even on your own.
In this article, we will look at how to glue wallpaper with your own hands quickly and efficiently, and what you need for this.
To carry out high-quality wallpapering in a room, you need to prepare the following tools for wallpapering, which will help you do all the work yourself at a high level:
- light and at the same time practical ladder;
- a clean plastic bucket for diluting glue;
- construction ditch, which will be glue;
- paint roller for spreading glue;
- wallpaper ruler for measurements, which also serves for cutting canvases;
- tape measure, pencil;
- a wallpaper brush, or a plastic spatula, which will help smooth out all the bumps and bulges that occur when wallpapering;
- rubber roller for joints;
- sponge or gauze to collect excess adhesive and thus create a clean finished surface.

This list is the necessary minimum, without which it is simply impossible to do. All of the listed wallpapering tools can be purchased at any hardware store.
Preparatory stage
Answer the question: “How to glue wallpaper with your own hands?” in a nutshell, hardly anyone will succeed. The gluing process is distinguished by certain actions that must be taken with the utmost care and accuracy in order to ensure the proper outcome of the work.
Rules for choosing wallpaper for sticking
The selection of wallpaper is perhaps the very first step. The appearance of the room after the repair, and the process of pasting itself, largely depend on it. After all, gluing thin low-quality canvases will be much more difficult.
It is important to choose the most suitable wallpaper option according to the pattern, color scheme, type, calculating with the help of the required number of rolls in order to completely paste over the room.
The range of wallpapers at the moment is quite large, so you need to take the choice with the utmost responsibility, choosing for yourself exactly the option that suits you the most.

Wall surface preparation
The quality of the finish largely depends on how correctly it is carried out.
First, remove the old wallpaper with hot water, rags or brushes. Sometimes ordinary water is not enough, and the old coating is well removed with your own hands only using a soapy solution.
After removing the old coating from the walls, all irregularities must be removed by applying a thin layer of putty. If this step is ignored, after wallpapering, all kinds of defects can spoil the appearance.

Sticking technology
It is better to start this stage with the preparation of glue, since it will take some time for it to thicken. Wallpaper glue must be diluted in accordance with the available instructions, where all the subtleties are prescribed.
If the adhesive mixture is diluted incorrectly, wallpapering can be complicated by the appearance of extremely undesirable problems in the form of lumps or too liquid consistency.
While the glue thickens, you can proceed to the preparation of wallpaper, namely the selection of a pattern and cutting strips of the desired length.
After the materials are prepared, you can start gluing the surface.
Where to start gluing
Many people start wallpapering in the room from the window in the old fashioned way. This is due to the fact that the seams of overlapped paper wallpaper with this type of pasting are less noticeable.

Since modern vinyl, non-woven and many other types of wallpaper are glued end-to-end, you can start pasting from anywhere. However, there are still some rules and tricks that will help you find answers to the question of how to glue wallpaper in various extraordinary cases:
- When gluing vertically, it is best to start from the door or window slope, because here it is very important to glue the first strip strictly perpendicular. In this case, it is better to additionally use a level or plumb line, which is quite realistic to do with your own hands.
- It is recommended to start gluing from the corner only if the corners of the room are perfectly even.
- In the case of pasting a room with a large number of windows, openings, niches or ledges, you need to start from the largest landmark.
- It is also possible to paste over a room from several lines. This technique is justified in the case of decorating a room with large windows or a door with wallpaper. The joint of the wallpaper will be less noticeable if it is made above them.
How to glue correctly
Wallpaper strips in the process of gluing must be carefully applied to the wall and gradually glued from the center to the edges, while stretching diagonally. Next, using a dry cloth or paint roller, we drive out all the air and excess glue from under the canvases.
Wallpapering can be done overlapping or end-to-end. The first option is acceptable for thin paper sheets, but it is better to end-to-end.

Heating radiators - a problematic, but important place when wallpapering
Every person who has ever had to paste over a room with their own hands has faced the problem of finishing behind the battery. This is the warmest and most comfortable place in the room creates certain inconveniences in the pasting process, so it is given special attention and a competent approach.
If we are talking about new buildings, where, as a rule, removable batteries and heating radiators are located, the question “how to stick wallpaper behind them” is solved very simply: first, the battery is dismantled (and it is done very easily and quickly), then the wallpaper is glued, and after they dry, the radiators are installed back. But what if it is not possible to remove the battery?
For proper gluing of the wall behind the heating radiator, it is recommended to cut the wallpaper into narrow strips and put it behind the battery. In this case, the surface of the wall behind it must be additionally coated with glue.
In what cases it is necessary to glue wallpaper sheets horizontally
You can also save a lot of time and effort when pasting the wall behind the battery using horizontal pasting. Also, this wallpapering technology can be used in the case of combining several types of paintings, that is, if you decide to glue the wallpaper horizontally to divide the room into two horizontal halves, or you want to emphasize some details in the design.
In any case, wallpapering should be done with high quality, avoiding the occurrence of air bubbles, scuffs and other damage and defects.
If it is not possible to glue the wallpaper in compliance with a perfectly even horizontal strip of the junction of two different canvases, you can resort to the following secret: stick a border tape, which will hide the unevenness of the connection.

Important rules for wallpapering
In order for wallpapering the walls to be really high quality, you should pay attention to the following rules for wallpapering:
- Wallpaper glue. It is important not only to choose the right glue, but also to use it correctly, so read the instructions and the rules for using the material in your work.
- Room temperature. It is impossible to glue the walls indoors at low temperatures, since the glue will not be able to provide the desired effect, and the wallpaper will freeze. It is also impossible to paste over the walls and ceiling in a room with high temperatures, since in this case the completely opposite effect is provided: the glue and the canvas itself dry out.
- measurements. It will be ugly if the canvas somewhere does not reach the right place, so it is recommended to accurately measure the walls or ceiling in advance in order to avoid inconvenience in the future. The secret to getting the measurements right is to cut off strips a few inches larger than required. In the future, this stock can be cut off or hidden with a plinth or baguette.
- Drawing selection. Many modern wallpaper options require quality selection of a pattern in order to create an attractive external effect with an accurate pattern or pattern. If you do not want to waste time on selection, you should choose wallpaper without a pattern. A significant advantage of such options is the fact that, if necessary, you can re-paste the wallpaper not completely, but only one or several strips.
In the list of materials in demand in interior decoration, paper wallpapers are far from the last place. Invented back in medieval China, they are practically the cheapest and, most importantly, environmentally friendly solution with which you can create a cozy and eye-pleasing environment without really bothering. But in order for the interior made with paper wallpaper to serve as long as possible without delivering extra hassle, it is important to study the main criteria for their selection and understand the practical intricacies of gluing and caring for them during operation.
Types and features of paper wallpaper
Paper is a fibrous material, moisture and grease easily penetrate into its structure. It is an excellent springboard for dust and is even able to absorb odors. All this must be taken into account when decorating the premises - if you choose the wrong wallpaper, the atmosphere prevailing here will soon leave its indelible imprint on them.
Protection of the paper web from aggressive operating factors is provided by a number of modern technologies. In accordance with them, the following types of paper wallpaper are distinguished:
- Smooth
The basis is paper of various grades, sometimes with a light-resistant basis, and the drawing on the front side is applied by printing.

- duplex
They have 2 layers, thanks to which they do not tear, and if necessary, they can be easily removed from walls or ceilings.

- embossed
Also two-layer, but the front side is embossed, i.e. has a certain, often patterned, relief.

- Structural
Are made with the addition of seals - sawdust, crushed walnut shells, etc., due to which they acquire a unique facial relief.

- Acrylic (foam wallpapers)
They are a two-layer canvas, on the front side of which a thin layer of foamed acrylic is laid - as a result, rather unusual patterns are obtained.
- moisture resistant
This type of wallpaper has a moisture-resistant coating, thanks to which they can be cleaned and washed.

Obviously, the more aggressive the atmosphere in the finished room, the higher the resistance to wear and tear should have wallpaper and the more they will cost. But the most important thing when buying is not to confuse different kinds canvases. For example, some paper wallpapers are almost indistinguishable in appearance from vinyl, which cannot be said about their price. In short, be careful not to accidentally overpay for properties you don't need.
Preparing for sticking

Paper wallpaper is a fairly simple material to work with, which is easy to handle even if you have no experience in gluing and alone. But first, it is necessary to properly prepare the surfaces to be trimmed: dust, remnants of whitewash and old wallpaper, etc. will not allow gluing normally, and defects in the rough finish will immediately appear on the front side of the canvas.
For sticking paper wallpaper you will need:
- roller or brush;
- wallpaper brush;
- tracer;
- plumb;
- construction knife;
- sponge;
- container for glue;
- wallpaper table;
- ladder;
- roulette;
- long line;
- wallpaper glue.

Having collected everything you need, you can begin the preparatory work. They are performed in the following order:
- Removing old wallpaper, whitewash and peeling plaster
Old wallpapers are very easy to remove if you scratch them first and moisten them with soapy water with a sponge. It is most convenient to work with a metal spatula. Those areas that peel off badly will have to be moistened again.
- Removing paint residue
Oil paint or enamel is removed with coarse sandpaper. Water emulsion and whitewash, similar to old wallpaper, is first soaked with soapy water, after which it is removed with a spatula.
- Elimination of defects of glued surfaces
For high-quality gluing of paper wallpaper, it is necessary to carefully plaster all the cracks and smooth out the bumps on the walls or ceiling, after which they should be cleaned with a plaster mesh.
- Primer
Before wallpapering, the surface of the walls and ceiling must be primed. This will ensure the normal setting of the glue and prevent the formation of air bubbles under the wallpaper.
- Cleaning
After completion of the preparatory work in the room, it is necessary to carry out wet cleaning. This will avoid contamination of new wallpaper during the cutting process.
Preparing for sticking paper wallpaper on the photo
Web preparation
Wallpapers are sold in rolls, which are printed immediately before work begins. But first you need to mark the walls. To do this, you need a plumb line and a tracer. In the absence of the latter, you can use the level, a long ruler and a pencil or chalk. You should mark the top level of the wallpaper (for rooms with high ceilings) and mark the joints of the canvas with vertical lines.

There are two methods of wallpapering: butt and overlap. If the first option cannot be used, the web should be glued in the direction towards natural or electric light.

Immediately before gluing, you can perform wall laying: along the lines of the corners, as well as the area along the baseboard and the ceiling line, a 10-cm strip of glue is applied. After 2-3 minutes, the wall will be ready for gluing.
When starting to cut the wallpaper, you should wipe the surface of the table or, in the absence of the latter, the floor area on which you will temporarily fold the cut pieces of the canvas. Cutting is carried out with a margin of 3-5 cm on both sides of each segment for a small overlap along the line of the baseboard and ceiling. The finished stack moves with a 10-15 cm indent, due to which, applying glue to the top sheet, you will glue the joint strip on the next one. And remember that paper tends to get wet quickly, so glue should be applied in a moderate layer.

After gluing, the upper strip is folded in half, after which the same action, only in the opposite direction, must be repeated. The folded strip is set aside, after which you can proceed to the next one while the previous one is saturated with glue. It’s not worth taking more than 3-4 strips into work: you may not have time with pasting, because wallpaper glue dries very quickly in the air.

Selection, preparation and application of wallpaper paste
For gluing paper webs of medium density, glue for lightweight wallpapers, for example, CMC, is ideal. As for its quantity, it depends on the area to be glued, which, like all the necessary proportions, must be indicated on the package. When buying, it is very important to pay attention to the presence of a quality certificate. The adhesive must not contain substances harmful to health.

Wallpaper glue preparation:
- 5-7 liters of water are poured into a pre-prepared container;
- the water is shaken and a dry adhesive mixture is poured into the resulting whirlpool;
- the resulting mass must be thoroughly stirred, and then left for some time to swell.
The thickened wallpaper adhesive must be homogeneous. If you find lumps, they are easily eliminated by re-mixing the mass.

Glue on the back side of the wallpaper should be applied evenly, distributing it over the entire plane. It is most convenient to use a roller for this. After applying the glue, you must wait 5-7 minutes for it to be well absorbed by the paper web.
If the adhesive accidentally gets on the front side of the wallpaper during application, it must be removed with a damp sponge. You should not apply too much effort in this case - it is better to use more water. This will preserve the structure and color of the front surface.

Some types of wallpaper glue have special additives that reduce the setting time. Therefore, before cooking, you must carefully read the instructions, otherwise you will find unpleasant surprises in the form of a composition that thickens too quickly.
The technology of pasting walls and ceilings with paper wallpaper
You need to glue the wallpaper quickly and accurately. That is why it is desirable to work together. Paper wallpapers are almost always laid with a slight overlap, otherwise, due to the low wear resistance of the canvas, the joints wear out very quickly.
The sheet of canvas that you glued first, after 5-7 minutes, unbends so as to gain access to the upper edge. Next, you need to stick the top strip on the wall - just on the section of the wall that you treated with glue. Now, holding the canvas by the top, it must be carefully unfolded and glued to the wall. Along the way, with smooth arcuate movements with a dry sponge or rag, you need to smooth the wallpaper until they stick properly.

Small air bubbles can be left alone. When the glue dries, the paper wallpaper will shrink a little and drive the air out. If the bubbles are large, they need to be carefully pierced with a needle and etch the air. In such areas, it does not hurt to add glue. This can be done with a syringe, while the edges of the canvas are best glued with a brush.

After gluing 4-5 sheets, it is very desirable to remove the indents - after the glue dries, carefully cut them off without affecting the main canvas, it will be very problematic. Do not forget to control the orientation of the pattern on adjacent sections of the canvas - it must match.
Wallpapering on the ceiling is carried out in a similar way, with the only difference being that the canvas should be placed perpendicular to the direction of illumination. Please note that on the ceiling, wallpaper is always glued end-to-end.

Joint lines between adjacent sheets must be rolled with a narrow rubber roller. It does not hurt to perform this operation when gluing wallpaper on walls with an overlap - as practice shows, it is here that they most often peel off due to the different microstructure, and hence the absorbency, of the front and back surfaces of the wallpaper. You also need to remember about cutting the web in the currents for placing switches and sockets. It is advisable to do this before gluing - after the hole it remains to correct with a clerical knife.

If you have done a thorough preparation for gluing, have chosen a reliable glue, correctly cut and pasted paper wallpapers, they will serve you for the longest possible time. Of course, provided that you protect them from damage, moisture and dirt.